![]()
2231 Crystal Drive
Suite 204Arlington, VA 22202

For Android users, download the OxiWear Fitness mobile application from the Google Play store.
For iOS device users, download the OxiWear Fitness mobile application from the Apple App Store.
Note: Each OxiWear Wearable should only be connected to one smart device at a time.
Follow the set-up tutorial on the OxiWear Mobile Application. The tutorial provides instructions to:
Your OxiWear wearable device will start illuminating a red light when the device is charged and powered on.
Your OxiWear charger case lights will start blinking when it’s connected to the power cable and is charging.
If the charger case is blinking red, your charger is below a 10% battery level. If none of the case lights are on, your charger case battery is dead. In both of these events, you need to remove the OxiWear wearable device from the charger case and charge the charger case for at least 6 hours until all four white lights come up.
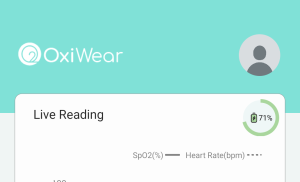
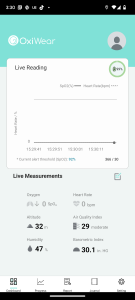
A live reading and battery reading should be shown on the mobile application’s home screen if your device is connected.
OxiWear collects location data even when the OxiWear mobile application is closed or not in use so long as Bluetooth AND location services are turned on.
The location data is required to connect to your OxiWear device and it enables the mobile application to generate better data analytics and performance data.
The following information is stored in the settings tab:
Note: To receive live measurements on the mobile application’s dashboard, you must have LOCATION ACCESS and BLUETOOTH turned ON. For SOS, you must add at least ONE contact name and number.
To update any of these sections, click on the title and make your edits, and then save the update.
Settings → ID Security → Security → forgot password OR you can click change password.
Place the OxiWear Wearable on the helix of the ear. The OxiWear Mobile Application will show placement error warnings if the OxiWear Wearable is placed in an incorrect location.
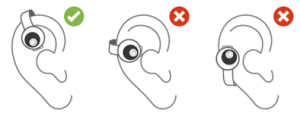
Proper Orientation of the OxiWear Wearable on Ear
CAUTION: Do not attempt to secure the OxiWear Wearable to the ear using additional pressure.
CAUTION: Prevent inaccurate readings by confirming the following:
 With your OxiWear bundle order, you will receive the wearable device with adjustment pads, a charging case, and an OxiWear charging cable.
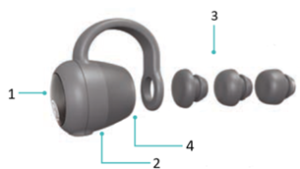
No. | Name | Function |
|---|---|---|
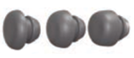
1 | Interchangeable Face Plates | Change the color or design of the OxiWear Wearable. |
2 | Optical Ear Pad | Houses sensor, battery, and all other electronics. |
3 | Adjustment Pads | Multiple adjustment pads allow the user to select the fit of OxiWear Wearable that is most comfortable. |
4 | Sensor | Optical sensor for SpO2 calculation. |
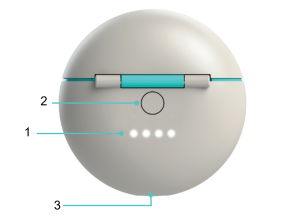
No. | Name | Function |
|---|---|---|
1 | Charge Indicator (for OxiWear Charger) | Indicates the charge level of the Charger. |
2 | Wake Button | Press to wake the OxiWear Charger to temporarily view the battery levels. |
3 | Charging Port | Port compatible with USB-C charger cable. |
Connect the charger cable to the bottom of the OxiWear Charger and connect the USB C to a power adapter. Allow the OxiWear Charger to charge until all four charge indicator lights are glowing.
The red light indicates your charger is below 10% battery levels. If no lights are coming on, your charger is entirely dead. In both of these events, you need to put your charger to charge for at least 6 hours until all four white lights come up.
The red light indicates your charger is below 10% battery levels. If no lights are coming on, your charger is entirely dead. In both of these events, you need to put your charger to charge for at least 6 hours until all four white lights come up.
The OxiWear Charger is provided with a compatible USB-A to USB-C power cable which can be connected to a UL listed power adapter (min 500 mA @ 5V). If needed, the OxiWear Charger may be charged with any USB-C cable that is 2.5 feet long or shorter.
The Battery Level of the OxiWear Wearable is displayed next to “Live Readings”.
Item | Description |
Battery Type | Rechargeable Lithium-Ion Battery |
Battery Life | 12 hr |
The adjustment pads are made of FDA-approved silicone. You can change the adjustment pads on the back of the OxiWear Wearable to the one that is most comfortable on your ear.
OxiWear Wearable Adjustment Pads
If your device vibrates one time, that means your oxygen level has dropped to the set threshold and the device is providing an alert for you. If the device vibrates two times, that means your battery level is below 10% and your device needs to be recharged in the charging case as soon as possible.
The faceplates are scheduled to be available in March 2023.
Go to Settings on the mobile application. Click device connection. The device that is currently connected will be displayed as well as the other available OxiWear devices. You can select which OxiWear device you want to use and switch between devices.
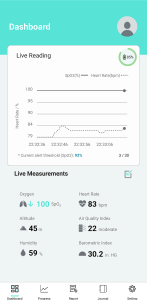 The OxiWear System displays live measurements obtained through the OxiWear Wearable, on the Dashboard area of the OxiWear Mobile Application.
The OxiWear Wearable communicates biometric information to the OxiWear Mobile Application via Bluetooth connection, including:
Live Measurements regarding the environment are obtained from the smart device, including:
Note: Location settings must be enabled on the smart device for environment information display.
The OxiWear Wearable vibrates when the SpO2 levels drop below the Alert Threshold.
To change the Alert Threshold value, select the Alert Threshold % next to “*Current alert threshold (SPO2)”. Then, select a SpO2 Alert Threshold. The alert threshold value can be set to a SpO2 level between 92% and 97%.
OR
Settings – > Set Threshold-> Set the level using the slider between 92% – 97%
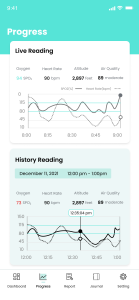 The OxiWear System provides both current and historic information from the previous two minutes, obtained through the OxiWear Wearable, on the Progress area of the OxiWear Mobile Application.
Progress can be accessed by selecting the Progress icon at the bottom of the application.
The information included in the Historic Readings includes:
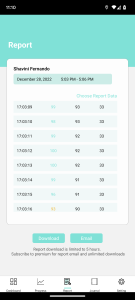 The OxiWear System allows for historic information to be exported form the OxiWear Mobile Application.
Previous information can be accessed by selecting the Report icon on the bottom of the application.
The date range can be selected by selecting “Choose Report Data” at the top of the screen.
Data can be exported by selecting either:
Note: The Report is limited to 5 hours data unlimited access and email option is only available for premium members. Contact OxiWear to learn more about premium membership.
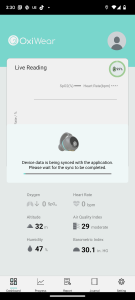 This occurs when your wearable device reconnects to your app after being disconnected for a long period of time. The loading window indicates that your device is syncing and uploading data.
When you download your mobile application, please scroll down to the Ratings & Reviews section to add your rating. We appreciate your support and feedback.
Possible Causes | Recommended Solutions |
|---|---|
|
|
| Possible Causes | Recommended Solutions |
|---|---|
|
|
| Possible Causes | Recommended Solutions |
|---|---|
|
|

| Possible Causes | Recommended Solutions |
|---|---|
|
|
| Possible Causes | Recommended Solutions |
|---|---|
|
|
| Possible Causes | Recommended Solutions |
|---|---|
|
|
Ensure that you are using either the power cable that came with your OxiWear device, or a USB-A to USB-C power cable which can be connected to a UL listed power adapter (min 500 mA @ 5V). Make sure the charger is fully plugged into the charging case. Check to make sure the outlet you are using is working. If your OxiWear power cable and/or any part of your OxiWear System is not working, please email support@oxiwear.com
![]()
